
Ever wish that you could check if you left your garage door open while away from home? Have you ever had the need to let someone into your house while you were away at the office? With a few components and a Raspberry Pi computer, you can now achieve this by connecting a relay to your existing garage door opener.
The following materials were used:
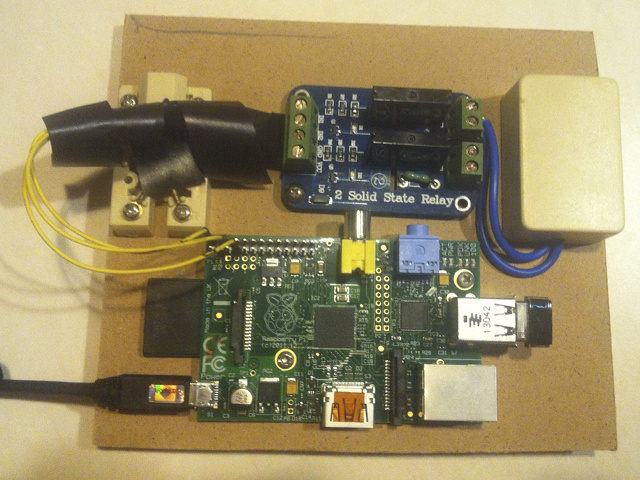
The first order of business is to get all of the hardware in place. A convenient way to do this is to mount each of the components to a piece of wood. I used some random nuts and bolts that I had laying around and then cut the board to size. The images below show both the front and the back of my Internet enabled garage door opener configuration. On one side is the Raspberry PI hooked to a relay. You’ll notice the wires feeding into two boxes. For convenience, I decided to hook the reed sensor and the wire closing the existing opener’s circuit to two little RJ-11 phone connectors that I found. This way, I can easily plug-in and plug-out the board to make it easy to take down for any future modifications that need to happen.
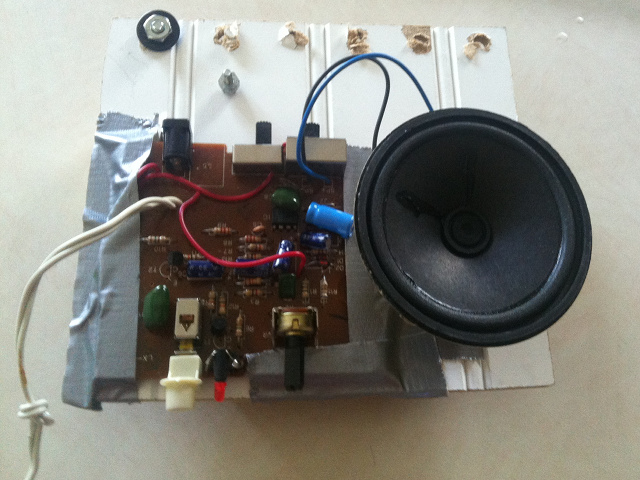
On the other side of the board, I took apart an old computer speaker that I had purchased at a yard sale for $4. I simply removed the outer housing and for convenience, duct taped it to the board.
| |
| |
|
Around each of the two GPIO pins that I ended up using, I added a 1k resistor. It is hard to see around my unraveling 1980’s electrical tape. This was put in place for further protection of the Pi’s circuitry so that nothing gets burned out. Do take caution since connecting the 5 volt wire to the GPIO pin could “Fry the Pi”.
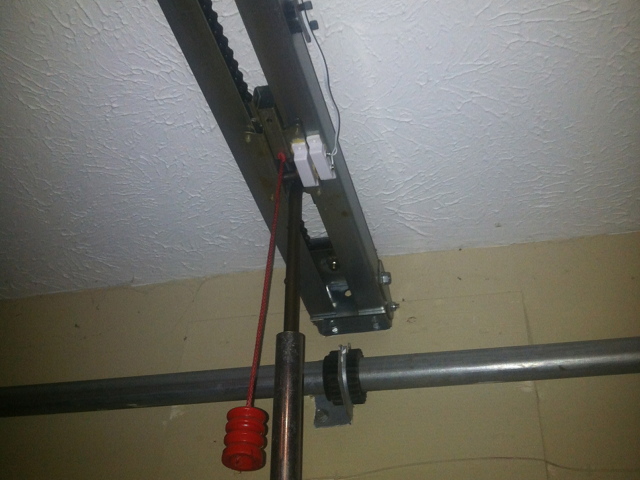
Below, I’ve included to images of the Internet enabled garage door opener setup mounted. The board is mounted near the garage door opener using some bolts. The magnetic reed switches are glued in place.
| |
| |
|
First on the software side, you will need to install several dependencies that our project will require. sudo apt-get update sudo apt-get install python-dev python-rpi.gpio git clone git://git.drogon.net/wiringPi ./build
Some documentation online will discuss the need to add an extra 10k resistor to prevent what is known as floating. Fortunately, the PI has some built in resistors in the GPIO pins to prevent floating. To use them, you just need to send the correct command installed along with wiringPi.
gpio mode 2 down
The current state of each gpio pin can be inspected readily with the following command. gpio readall
The following code was used to respond to the door being opened or closed by either the existing wall keypad or the wireless openers in the cars. This script will check the starting state against the current state and then speak through the speaker after the door is finished moving. It must wait until the door is done moving so that you can here the computerized voice over the movement of the door which takes about 13 seconds to open/close.
#!/bin/bash
/home/pi/t.sh Garage Door Services Initialized
/usr/local/bin/gpio mode 2 down
/usr/local/bin/gpio -g mode 4 out

STATE=`/usr/local/bin/gpio read 2`
echo Current state is $STATE
while true
do
  sleep 1
  STATENOW=`/usr/local/bin/gpio read 2`

  if [ $STATENOW -ne $STATE ];
  then
    STATE=`/usr/local/bin/gpio read 2`
    echo `date` Status: $STATE
    if [ $STATENOW -eq '0' ];
    then
      sleep 12
      /home/pi/t.sh The garage door is open.
      # Todays weather is 70 degrees.  Enjoy the season.
      # Today is a full moon.
      # Happy Easter
    else
      /home/pi/t.sh The garage door is closed.
    fi
  fi
done
To toggle the state of the relay, the following code can be used. You may have to vary it depending on which GPIO pins you wire your PI up to the relay with.
#!/bin/sh
if [ `gpio read 2` -eq 1 ]
then
  /home/pi/t.sh Please standbye, the garage is now opening.
else
  /home/pi/t.sh Please standbye, the garage is now closing.
fi

/usr/local/bin/gpio -g write 4 1
sleep .75
/usr/local/bin/gpio -g write 4 0
Here is the code that calls out to Google to provide the computerized voice synthesis that you hear from the speakers. I usually place this in a file at /home/pi/t.sh Also, don’t forget to set the mode of your shell scripts to executable with the command ‘chmod 755 filename’.
#!/bin/bash
say() { local IFS=+;/usr/bin/mplayer -ao alsa  -softvol -softvol-max 300 -volume 100 -noconsolecontrols "http://translate.google.com/translate_tts?tl=en&q=$*"; }
say $*
If the volume of the attached speaker that you have is not loud enough, you can partially mitigate this further by setting the Raspberry Pi’s audio to maximum output. This can be done by installing and calling “alsamixer”. Additionally, different options can be passed to mplayer if you do not hear audio (i.e. -ao alsa:device=hw=0.1).
| If you would like to connect to open your Garage door outside of your home, then you may want to consider having your Raspberry Pi call to a static website to submit its IP address at regular intervals. For more information, please see [[raspberry-pi-static-dynamic-ip | Raspberry Pi Static Dynamic IP]]. |
=== Random Thoughts and Observations === After completing this project, one thing that I noticed was that the original range of the garage door openers in our car was greatly diminished. Sometimes I had to press the garage door opener in front of my garage up to three times because the opener seemed to not be receiving the signal as clearly as before. Although this could be attributed to low batteries in our 303 Mhz opener, I tend to feel that the WIFI adapter or the system itself is causing some type of minor interference. To mitigate this, one could try to use a USB extension cord and mount the nano USB wifi adapter further from the opener.
Last modified: 04/07/2020